I’ve been tidying up a bit around the blog lately. I have finished changing some of the category names as well as moving around my free tutorial section.
I have streamlined the categories a bit and added a few new ones including: “Christmas Crafts”, “Halloween Crafts”, and “Cheap Crafts”. “Christmas Crafts” and “Halloween Crafts” are self explanatory, but “Cheap Crafts” is a little different.
We are all pinching our pennies these days, so I figured I would share with you some cheap crafts that I have found in my searches online. Whenever I complete a project using a free online pattern that cost me next to nothing to make (under $5.00), I’ll share it with you. I’ll be sure to include the link to the project, a picture of the finished project, and the breakdown of the cost. I hope this will come in handy for everyone, especially when the holidays roll around.
As far as the tutes go, I have put them all in alphabetical order instead of by the date they were posted. I think it makes it easier to find them, at least for me it does.
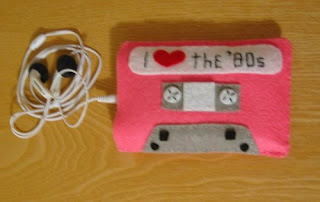
I am working on a few new tutorials that I’ll be sharing with you in the next few months. When they are posted I’ll add “New” next to them on the list so you can find them easily. Unfortunately, I don’t have any new tutorials to share with you today, but I thought I’d re-post my top tutorial, Cassette iPod case.
When I came up with this quick ’80s pattern for my ’80s craft-a-long I had no idea that this little iPod case would be such a huge hit. It is super easy, cute, and cheap, so why not whip up one for yourself this weekend!
I love ’80s music! From hair bands to new wave to love songs, I can’t get enough of ’80s music. And my iPod can attest to that. I have several different ’80s playlists on it including, “Slow Jams”, “New Wave”, and “All About the ’80s”. So, it was only fitting that I make an ’80s iPod case.
If you’ve ever read my blog or seen my craft projects you know I tend to use a lot of felt. I like it because it is quick, easy, and cheap! This little iPod case cost me a whopping $0.60 and was finished in about 45 minutes.
Want to make one for yourself? Here is how you do it.
Materials
1 sheet of colored felt
felt scraps (grey, white, black, and red)
matching embroidery thread
embroidery needle
Instructions
1. Cut two pieces of felt, the size of your iPod, and contrasting colored felt scraps for the bottom part of the cassette tape, the the part where the tape is wound, and the label. I used one sheet of pink felt for the case, grey felt scraps for the bottom part of the cassette and the back part of where the tape is wound, black felt for the notches, and white felt for the label, cassette reel, and center of tape.
2. Embroider four lines on the cassette reel (white circles on the tape).
3. Embroider your mix tape message on the label. I embroidered “I”, “the”, and “’80s” and then cut a heart out of red felt.
4. Use a running stitch to attach all of the pieces to the front of the iPod case and whip stitch the case closed. Don’t forget to leave the top open for your iPod to slip in.
That’s it! It’s such a super simple project that you can make some for yourself, family, and friends. If you do decide to make some, please send me a link to your pictures. I’d love to see them!
. . . . . . . . . . . . . . . . . . . . . . . . . . . . . . . . . . . . .
© 2009 Missie Zee
Please remember that items made from my patterns and tutorials are for personal use only and can not be sold for profit. Thanks!


Thank you for your nice comment on my blog. I had fun browsing through your blog. I especially love the Nancy Drew book cover tha you crocheted. I also love that you have a cat. I’m a big fan. 🙂
~Jenifer
Thank you for your nice comment on my blog. I had fun browsing through your blog. I especially love the Nancy Drew book cover tha you crocheted. I also love that you have a cat. I’m a big fan. 🙂
~Jenifer