I’ve been getting a few mini projects out of the way so I can start one major project. That project is going to be HUGE and I must get started on it, but I just keep putting it off. I will start working on it this week, I promised myself!

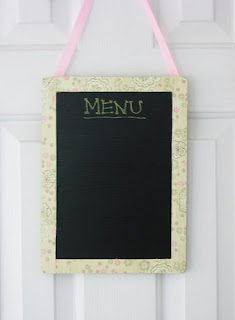
Many of my kitchen projects are still works in progress, but I did manage to finish this mini project for a blackboard menu.

I made this for my weekly dinner menus. I want to start eating healthy, so I figure if I physically see what I am supposed to eat during the week maybe I’ll actually eat it! As you can see there are no menus on there yet, not looking good. Maybe next week. 🙂
Want to make a blackboard menu of your own? It is really simple, and pretty cheap, especially if you have some of the craft materials already.
Materials & Tools
wood plaque (This is the exact one I bought, but I needed to use blackboard paint to get the chalk to stick.)
Modge Podge
2 foam brushes
1 large piece of scrapbook paper
ribbon
stapler & staples
exacto knife
colored chalk
Directions
1. With one foam brush, paint the middle of the plaque with blackboard paint (I used two coats of paint). Be sure to paint in one direction. You’ll be able to see the brush strokes if you don’t. Let paint dry overnight.
2. Use an exacto knife to cut pieces of scrapbook paper the length and width of the plaque. I cut four pieces (two for the sides, one for top, and one for bottom).
3. With the second foam brush, spread a thin layer of Modge Podge onto the wood (this acts as the glue). Lay scrapbook paper pieces onto wood and press down over Modge Podge, making sure to press out any air bubbles. I “glued” the top and bottom pieces on first and then the side pieces. Let sit for 5 minutes.
4. Spread thin layer of Modge Podge over scrapbook paper. Let dry overnight.
5. Cut ribbon to the length that you want your blackboard to hang. Staple ribbon to the top right and top left back of the blackboard.
6. Place one felt pad on the bottom right and bottom left back of the blackboard. This will help keep your blackboard from banging against a window or door.
7. Enjoy your new blackboard menu!

All in all, my finished menu came in around $6.00. I used a 50% coupon from AC Moore, which I used to buy the blackboard paint and wood plaque, and I had everything else.
While this project might not be super cheap if you have to buy all of the materials (the blackboard paint is pretty pricey without a coupon), I think it is still cheaper than buying an already made blackboard. Plus, this one is way cuter!
. . . . . . . . . . . . . . . . . . . . . . . . . . . . . . . . . . . . .
© 2009-2012 Melissa/Crafting with Cat Hair
Please remember that items made from my patterns and tutorials are for personal use only and can not be sold for profit. Thanks!
Oh yay! I need to make one of these for an upcoming shower, thanks so much! I'll be linking.
Cute!
Very cute~ I adore it.
Very cute~ I adore it.
Love it! It looks awesome!
Love the idea . . . similiar to my chalkboards here: http://www.etsy.com/view_listing.php?listing_id=31210775
Love the idea . . . similiar to my chalkboards here: http://www.etsy.com/view_listing.php?listing_id=31210775
I love how simple this is! I will be featuring it on CrazyDomestic.com this Wednesday as part of my menu planning workshop! Thanks for the idea!
I love how simple this is! I will be featuring it on CrazyDomestic.com this Wednesday as part of my menu planning workshop! Thanks for the idea!