New Kids Stitch Marker Tutorial – flashback

So, as the final week of the ’80s craft-a-long begins, I thought I’d re-post this tutorial for these ’80s inspired stitch markers. If you are…

by 

So, as the final week of the ’80s craft-a-long begins, I thought I’d re-post this tutorial for these ’80s inspired stitch markers.

If you are a crocheter or knitter, these stitch markers will be perfect for you. Enjoy!
“Step by Step” stitch markers

Download PDF

Materials/Tools

round-nose pliers
needle-nose pliers
wire cutter
round plastic alphabet beads
assorted colored beads
head pins or eye pins
S-hooks

Directions

Step 1: We can have lots of fun

Choose the beads you want to use.


Step 2: There’s so much we can do

Place the beads in order on the head pin and cut off any excess wire, leaving about an inch from the top of the bead.


Step 3: It’s just you and me

Hold the head pin in the round-nose pliers with one hand.
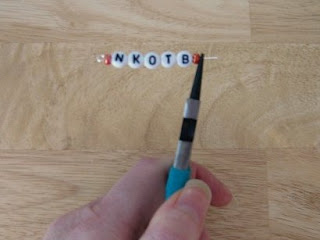

Using the other hand, take the needle-nose pliers and bend the wire to form a small loop.


Step 4: I can give you more

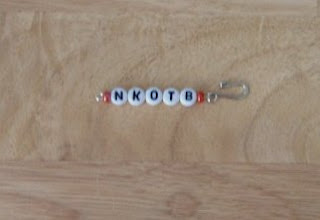
Hook the small loop onto the S-hook and tighten the the loop by squeezing it shut with the round-nose pliers.

Step 5: Don’t you know the time has arrived

Ta Da! You now have your very own stitch marker.


To attach the heart: place the heart on a head pin, bend the wire to form a loop, hook the head pin and heart to the loop end of the eye pin, and squeeze shut.

Also remember if you are making name stitch markers, only six letters fit on one pin. Thank goodness all the guys’ names were six letters or less.

Now go on and make a whole “funky bunch” for yourself and your crocheter/knitter friends. I know that’s Marky Mark but he’s a sibling extension of the group, so I couldn’t resist.

. . . . . . . . . . . . . . . . . . . . . . . . . . . . . . . . . . . . . . . . . . . . . . . . . . . . . . . . . . . . . . . .

© 2008-2012 Melissa/Crafting with Cat Hair

Please remember that items made using my patterns and tutorials are for personal use only and can not be sold for profit. Thanks!

2 comments

  1. You are so cute! Thanks for the tutorial! I’m sending this to a friend who’s still a huge fan!

    Wow, I can’t believe it’s the final week! Time flies!

  2. You are so cute! Thanks for the tutorial! I’m sending this to a friend who’s still a huge fan!

    Wow, I can’t believe it’s the final week! Time flies!

Comments are closed.

New Kids Stitch Marker Tutorial – flashback

So, as the final week of the ’80s craft-a-long begins, I thought I’d re-post this tutorial for these ’80s inspired stitch markers. If you are…

by 

So, as the final week of the ’80s craft-a-long begins, I thought I’d re-post this tutorial for these ’80s inspired stitch markers.

If you are a crocheter or knitter, these stitch markers will be perfect for you. Enjoy!
“Step by Step” stitch markers

Download PDF

Materials/Tools

round-nose pliers
needle-nose pliers
wire cutter
round plastic alphabet beads
assorted colored beads
head pins or eye pins
S-hooks

Directions

Step 1: We can have lots of fun

Choose the beads you want to use.


Step 2: There’s so much we can do

Place the beads in order on the head pin and cut off any excess wire, leaving about an inch from the top of the bead.


Step 3: It’s just you and me

Hold the head pin in the round-nose pliers with one hand.


Using the other hand, take the needle-nose pliers and bend the wire to form a small loop.


Step 4: I can give you more

Hook the small loop onto the S-hook and tighten the the loop by squeezing it shut with the round-nose pliers.


Step 5: Don’t you know the time has arrived

Ta Da! You now have your very own stitch marker.


To attach the heart: place the heart on a head pin, bend the wire to form a loop, hook the head pin and heart to the loop end of the eye pin, and squeeze shut.

Also remember if you are making name stitch markers, only six letters fit on one pin. Thank goodness all the guys’ names were six letters or less.

Now go on and make a whole “funky bunch” for yourself and your crocheter/knitter friends. I know that’s Marky Mark but he’s a sibling extension of the group, so I couldn’t resist.

. . . . . . . . . . . . . . . . . . . . . . . . . . . . . . . . . . . . . . . . . . . . . . . . . . . . . . . . . . . . . . . .

© 2008-2012 Melissa/Crafting with Cat Hair

Please remember that items made using my patterns and tutorials are for personal use only and can not be sold for profit. Thanks!