You now have your blog looking the way you want it, either a 2 column or 3 column layout, but it is still looking pretty, blah. It is now time to spice it up with a little color!
Don’t forget to save your template before making any changes!
Since I already have my digital scrapbook kit chosen, my colors are going to be green, purple, and yellow. You might have to tweak your colors a little once you set up your header, but that won’t be a problem. Just follow this lesson to make any color changes.
There are two ways to change your blog’s colors: the simple way through the Fonts and Colors tab for simple color additions (title, sidebar title, sidebar text) or the more complex way through the Edit HTML tab for more complex and customized additions (post background and inside background). We’ll be using both in this lesson.
The simple way, well, is really simple. Under Layout, click on the Fonts and Colors tab. The left of the screen lists the various items you can add color to: text, links, titles, etc. To the right of that are the colors you can use.

All you have to do is click on each item and then choose the color you wish to make that item. Piece of cake!
Let’s go ahead and change the colors for the text color, link color, post title color, sidebar title color, sidebar text color, and visited link color. You can change the font and font size now too.
If you don’t like the colors that Blogger offers, you can use html color codes. You can find these all over the internet by searching “html color codes”. The site that I love to use is december.com. They offer a wide variety of different colors in a very easy to read format. Place your color code in the box to the right of the colors labeled Edit Color Hex Code. Don’t forget to include the # symbol along with the letter/number combo.
After you’ve chosen your colors, you will want to see what they look like. You can do so by clicking the View Blog tab.
Some of the items you just changed will not be visible until you include a post and some links to your sidebar. Let’s set those up now.
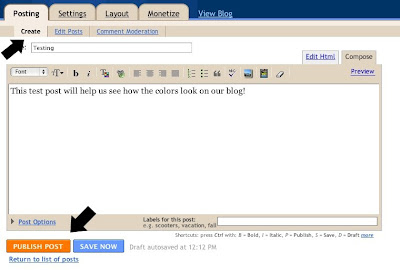
To write a post, click the Posting tab and then Create. Next, type a title, type some text, and click Publish Post.
Next, let’s add a widget or gadget. Click on Layout and Page Elements. Next, click on Add a Gadget to either the left or right sidebar. Scroll down until you see Link List and click the + symbol. Go ahead and add a title to the list, a blog URL, and a blog name. Click Add Link then Save.
Now we are able to see all of our colors!
 We can also change the color of our text background and inside background. The Blogger default color is white, so if this is good for you then no more changes need to be made. But we’re going to change some colors!
 Open the Edit HTML tab under Layout. Scroll down until you find:
/* Outer-Wrapper
———————————————– */
———————————————– */
We are going to change the colors on all of the items under this header (outer-wrapper, main- wrapper, sidebar-header, left sidebar-header).
First up is the outer-wrapper.
#outer-wrapper {
width: 880px;
margin:0 auto;
padding:10px;
text-align:$startSide;
font: $bodyfont;
}
width: 880px;
margin:0 auto;
padding:10px;
text-align:$startSide;
font: $bodyfont;
}
Directly under the line #outer-wrapper {, place the text
background-color:#FFFFFF;
The html color code will need to be changed to whatever color you prefer for your background. This color code (#FFFFFF) is for the color white. Try out different colors to see which one fits your color scheme.
Go ahead and add this text under the remaining three wrappers.
 I only changed the color on the outer-wrapper to a light yellow (#FFFCFF), since I wanted to keep my boxes where the text is located white. The main background is also still white. We’ll change that with a background from a scrapbook kit.
When you are happy with your colors, click Save Template and View Blog.
How does it look? The borders and text are going to be a little tight. We’ll fix that next week along with adding some border color and dividers. I was going to include them in this lesson, but I think they deserve their own!
Don’t forget to start thinking about your digital scrapbook kit and images. We’ll be designing headers July 10!


I just found your blog today – I love the name of it!
Sharon
Fellow Cat Person
I just found your blog today – I love the name of it!
Sharon
Fellow Cat Person
This is so great! I have NOT had time to settle down and put your instructions to work — but I will!
This is so great! I have NOT had time to settle down and put your instructions to work — but I will!